Wednesday, March 7, 2018

I love Amazon. It has been the answer to my aversion and distaste for the shopping scene. Yet, there are still times where online shopping shows limitations. For instance, it is hard to judge the comfort and feel of a mattress without a visit to an old-school brick and mortar establishment. So, despite the convenience of “one-click” purchasing, sometimes the “old-ways” really are the best ways.
It is no different in dentistry. With the incredible pace at which technologies and materials continue to develop, I feel it has become common place to abandon tried-and-true methods that still can get the job done. It is my belief that at times, we over complicate treatment and anguish over which plan is best. We need to keep in mind that no matter the challenge, one cannot replace “old-school” fundamentals: a good prep paired with a plan that is uniquely designed and executed for that patient, equals a good chance for long-term success. Below is one such example.
A patient presented with a failing endodontically treated tooth #9. The existing post/core and crown had fallen out and the patient wished to have it replaced. After thorough discussion, it was noted that teeth #8 and #10 also required additional work and new crowns. It was mutually agreed upon that a classic 3-unit PFM bridge would be the best approach.
Work began by re-treating abutment teeth #8 and #10 to insure the prescribed bridge was constructed on a solid foundation. Once endo-resto was completed, the abutment teeth were prepped using a single-use, medium grit diamond. Tooth #9 was also extracted during the same visit. The patient was then fitted for a custom temporary to develop an ovate-pontic receptor site for #9.
My preferred prep-design for fixed crown and bridge are modified-shoulders. In my opinion, the ideal bur to create a shoulder look that also features a rounded internal line angle design are KR Modified Flat-End Taper burs. My preferred choice is 0816.8M (medium) sold by Microcopy. My background as a dental lab technician has taught me over the years that if I can provide the lab with a circumferential, 360-degree 0.8 mm shoulder/chamfer, they can provide me with any material choice and design feature required for case completion.
Prep design and planning are essential to long term fixed prosthetic success. For this reason, I have become particularly interested in single-use burs in recent years. There are many to choose from, but I most frequently prep with those made by Microcopy. Single-use burs from Microcopy cut aggressively and are extremely efficient, not to mention each bur comes pre-sterilized. Advantages of single-use include: no chance of cross-contamination, reduced overhead and a fresh cut every-time you open the package.
Final impressions were captured after 6 weeks of healing to allow for soft tissue development and maturation. The prescribed lab work was ordered and completed by Maverick Dental lab. The case was seated using Ceramir cement.
For me, the decades long track record of fixed partial dentures keeps them a viable option even in the modern dental practice. Therefore, do not so easily abandon the well-worn road. Be mindful of good techniques firmly planted in tried-and-true methods the next time a case like this, graces your chair. Call me sentimental, but sometimes the old-ways are still the best ways.
Here’s a look at the case step by step:
Figure 1: A pre-operative model shows where the bridge is needed at tooth #9

Figure 2: An occlusal view of the pre-op model

Figure 3: A pre-op radiograph shows the need for the treatment

Figure 4: A post-op x-ray showing the completed root canal treatment of teeth #8 and #10

Figure 5: Frontal view of the temporary bridge

Figure 6: A side view of the temporary bridge – Note the shape of the ovate pontic

Figure 7: The preps for the bridge
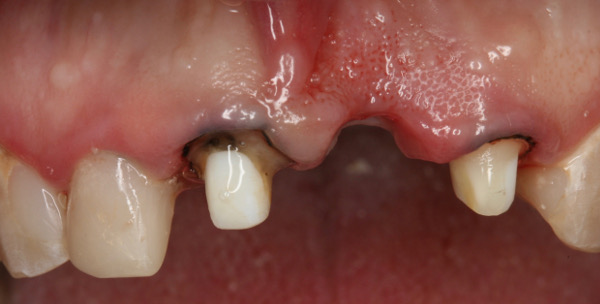
Figure 8: An occlusal view of the preps

Figure 9: A side view of the preps

Figure 10: A close up view of the side of one of the preps

Figure 11: A close up view of one of the preps

Figure 12: A view of the VPS impression used to communicate with the lab for the fabrication of the PFM bridge

Figure 13: A close up view of the impression

Figure 14: Another close up view of the impression

Figure 15: The case prepared to send to the lab for PRM bridge design and fabrication

Figure 16: The case when completed with a seated PFM bridge

Figure 17: The completed case in full occlussion

Figure 18: A lingual view of the completed case with the seated 3-unit PFM bridge
